This chapter contains the following topics:
Printing Time Worked Edit List
Use this selection to enter records of time worked by your employees. When you have finished entering time worked, use Calculate payroll to calculate the check amounts for each of your employees.
With this selection you can:
| • | Print a payroll attendance worksheet (Attendance worksheet). This lists employees eligible for pay this pay period, with spaces for writing down the information to enter in the computer. This worksheet helps you organize and prepare your payroll information. |
| • | Enter or edit individual payroll entries (Enter). |
| • | Generate payroll entries (Standard payroll) automatically for many employees at once. |
This optional feature is useful when pay is routinely distributed to G/L accounts and when overtime, special pay, and temporary deductions / earnings are not a consideration.
Even when such complications are present, it is often more efficient to run all the employees through Standard payroll first, then use Enter to fine-tune the exceptions.
| • | Print an edit list of payroll entries (Edit list) to verify that all the payroll entries (from both Enter and Standard payroll) are correct. |
At this point you are ready to run Calculate Payroll and Checks.
Select
Attendance worksheet from the PR menu.
|
Note |
If you answered Always manually distribute to the Distribute Wages? question in Control information, the selection 4 above (Standard payroll) does not display. |
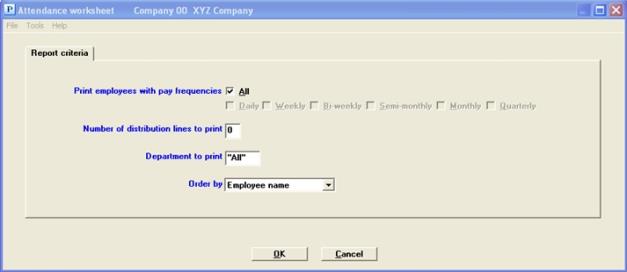
The Payroll Attendance Worksheet lists employees, with a line next to each employee where you can note payroll information. This includes hours worked, temporary deductions and earnings, and details concerning G/L distributions. Printing this is not a requirement, but some users find it convenient to print a worksheet each pay cycle, then hand-write the coming payroll data on it and use that as a guide when doing the Enter selection.
Graphical Mode
The following screen displays:

Character Mode
The following screen displays:
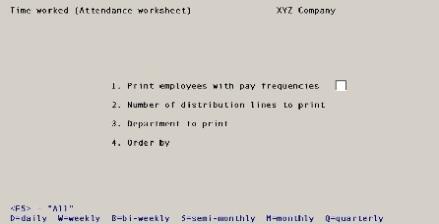
Enter the information as follows:
Print employees with pay frequencies
Options
Enter the pay frequencies of the employees you want to appear on the report. Valid frequencies are:
| Character | Graphical |
|
D |
Daily |
|
S |
Semi-monthly |
|
W |
Weekly |
|
M |
Monthly |
|
B |
Bi-weekly |
|
Q |
Quarterly |
|
<F5> |
In character mode, for "All" pay frequencies |
|
Format |
Graphical: Check box. Up to 7 check boxes. One check box for "All". If "All" is not checked, then the individual frequencies may be selected. The default is "All" Character: Up to six frequency codes, each consisting of a single letter selected from the list above. The first blank terminates data entry. |
|
Example |
Graphical: Check Bi-weekly and check Semi-monthly Character: Type B, then type S, then press <Enter> again. |
Number of distribution lines to print
A number of lines are provided for distribution of an employee’s hours or salary to various G/L accounts. Enter a number up to 9, to specify how many lines to print for noting distribution information.
|
Format |
9 |
|
Example |
Type 3 |
When you enter an employee’s record, you enter a 4-digit department number for the employee. Then at this field you can select an employee department for which to print an attendance worksheet.
Options
Enter a specific department or use the option:
|
<F5> |
For All departments |
|
Format |
9999, In graphical mode the default is "All" |
|
Example |
Press <F5> |
Options
Specify the order in which to print the employees on the worksheet:
| Character | Graphical | Description |
|
1 |
Employee # |
Employee number |
|
2 |
Employee name |
Employee name |
|
3 |
Employee # within dept |
Employee number within department (only available if printing "All" departments) |
|
Format |
9 |
|
Example |
Select Employee # or type 1 |
Make any needed changes, then select OK or press <Enter> to print the worksheet.
This selection generates standard payroll entries for employees who do not have their pay manually distributed. This feature is optional. If used, you should run this first then adjust individual entries as needed (for example, to add overtime) using Enter.
If any payroll time entries are already on file, Standard payroll cannot be run, and the program displays a message advising you of the existing time entries. You can either delete the entries, or use Calculate payroll and Checks to post the existing entries before coming back to use Standard payroll.
|
Note |
When you enter Control information for the payroll system you can specify how salary and wages are distributed. You have three choices: |
| • | Never distribute: General ledger distributions are never entered for employee time entries. |
| • | Always distribute: General ledger distributions for employee time entries must always be entered. |
| • | Selectively distribute: Whether general ledger entries are entered depends upon the answer to the Distribute wages ? question in the Employees record. When the answer is Yes, then general ledger distributions must be entered for the employee. When the answer is No, general ledger distributions are never entered for the employee. |
Standard payroll never creates time entries for non-employees. Non-employees (contractors, etc.) can indeed be paid, but only using Enter.
When you specify Never distribute, then you can generate time entries for all employees, both hourly and salaried, regardless of how the employee’s Distribute wages ? question has been answered.
When you specify Always distribute, you cannot generate time entries for any employee.
When you specify Selectively distribute, time entries are generated only for employees whose Distribute wages ? question has been answered No.
Select
Standard payroll from the PR menu.
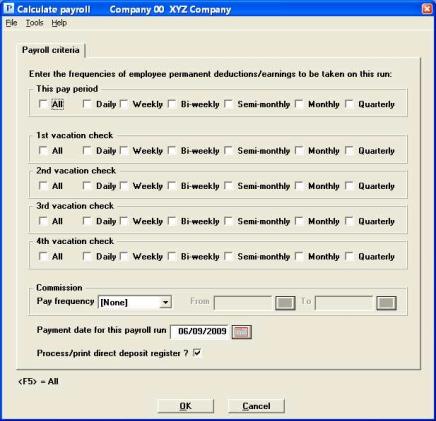
The following screen displays:
In character mode the following screen displays:
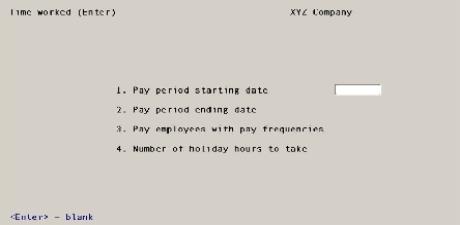
If your state requires a pay period starting date, as well as an ending date, enter the starting date here. Otherwise, press <Enter> to skip this field.
Even if you specify a starting date here, you are not forced to use that date for each employee in this payroll run. The date merely becomes available as a default.
If you generate entries for several pay frequencies, the starting date can apply to only one of them, so you need to change this date for the applicable payroll entries.
Options
You have the following option:
|
<F4> |
To select a date from the calendar lookup |
|
Format |
MMDDYY |
|
Example |
Press <Enter> to leave blank |
This is the ending date of the pay period for which standard payroll entries are to be generated. This field is required.
Options
You have the following option:
|
<F4> |
To select a date from the calendar lookup |
|
Format |
MMDDYY The system date is displayed as the default |
|
Example |
Type 110104 |
Pay employees with pay frequencies
You may select all frequencies. The All check box is defaulted as checked. If you uncheck it, then you may select the individual frequency options.
Options
Check the boxes of the pay frequencies of the employees for which standard payroll entries are to be generated. Valid frequencies are:
|
Daily |
|
Semi-Monthly |
|
Weekly |
|
Monthly |
|
Bi-Weekly |
|
Quarterly |
|
Format |
Check boxes, one for each pay frequency listed above and one for All. |
|
Example |
Select <Enter> to take the default of All |
Number of holiday hours to take
If you want every entry to include the same amount of holiday hours, enter that amount here. For hourly employees, the amount of regular hours are reduced by the amount of holiday hours entered here. You can press <Enter> for zero.
For a salaried employee, the holiday hours are considered a part of the employee’s regular salary.
|
Format |
99.99 |
|
Example |
Press <Enter> |
Make any needed changes.
If continuing, click on the OK button. There will be a period of processing while entries are generated for each selected employee. If you do not want to process standard payroll, select the Cancel button and you are returned to the main menu.
Standard payroll entries are generated for all employees who:
| • | Are not terminated, and |
| • | Have one of the specified pay frequencies, and |
| • | Do not have their pay manually distributed to G/L accounts. |
Generated entries can be printed on the Time worked Edit list, and they can be changed or deleted through Enter.
Use this function to enter, change, or delete time transactions. Time transactions can either be entered with this selection of generated automatically with Standard payroll (or both), and transactions created by either method can be changed, deleted, or merely viewed by using this selection.
Enter lets you specify additional information for a time transaction such as overtime, holiday, sick, and vacation hours, as well as temporary deductions and earnings.
You can also specify that an employee is paid up to 4 weeks of vacation pay.
Select
Enter from the Time worked menu. A screen like the following displays:
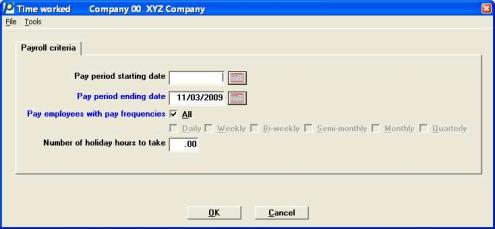
In character mode the following screen displays:
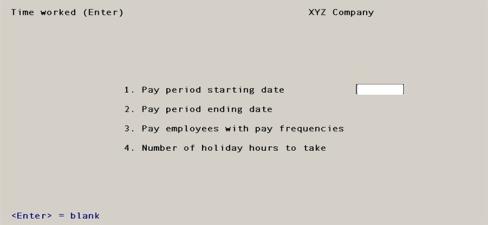
This selection works in two stages. First you select the frequencies of the employees you intend to pay in the next payroll run, then a second screen displays so you process all the employees who have that frequency.
| • | You can rapidly bypass employees who need no change. |
| • | Conversely, you can select employees who do not match the selected frequency. |
When done processing those employees, you can return to the first screen to select a different frequency.
Suppose you intend to pay all your monthly and weekly employees in the next pay run, and only those employees. There are two ways of doing this:
| • | You can state in the first screen that you want to look at all the monthly and weekly employees. On the second screen, page through each employee in turn, skipping the ones that require no change. |
| • | You can process all the monthly employees first, then return to the first screen and repeat the process for all the weekly employees. This is convenient if the kind of special handling required for monthly employees tends to be consistently different from that required for weekly employees. |
If your state requires a pay period starting date, as well as an ending date, enter the starting date here. Otherwise, press <Enter> to skip this field.
If you are adding entries for several pay frequencies, the starting date applies to only one of them. For other frequencies, you need to manually set the pay period starting date.
Options
You have the following option:
|
<F4> |
To select a date from the calendar lookup |
|
Format |
MMDDYY |
|
Example |
Press <Enter> |
This is the ending date of the pay period for which these payroll time entries are being created.
The date you enter remains on file until the current entries have been posted.
If there are no entries on file, the current date is displayed. If entries are already on file, the pay period ending date that was entered for them is displayed.
Options
Enter a date or use the options:
|
<Enter> |
For the displayed date |
|
<F4> |
To select a date from the calendar lookup |
|
Format |
MMDDYY |
|
Example |
Press <Enter> to accept the date that was entered during Standard payroll |
Pay employees with pay frequencies
Select the pay frequencies of the employees. The All check box is defaulted as checked. If you uncheck it, then you may select the individual frequency options.
Options
Check the boxes of the pay frequencies of the employees for which time worked payroll entries are to be generated. Valid frequencies are:
| Character | Graphical |
|
D |
Daily |
|
S |
Semi-Monthly |
|
W |
Weekly |
|
M |
Monthly |
|
B |
Bi-Weekly |
|
Q |
Quarterly |
|
Format |
Check boxes, one for each pay frequency listed above and one for All. |
|
Example |
Select Bi-Weekly, select Semi-Monthly, then press <Enter> again. |
Number of holiday hours to take
The number of hours you enter here determines the default number of holiday hours when entering each time transaction. When entering time transactions, you can default the transaction to its typical values. When you do this, holiday hours for the transaction are set to the value you enter here.
For a salaried employee, the holiday hours are considered a part of the employee’s regular salary.
|
Format |
99.99 |
|
Example |
Press <Enter> |
Make any needed changes, then press <Enter> or the OK button to continue. If you do not want to enter time worked records, select the Cancel button.
Graphical Mode
In graphical mode the following screen displays:
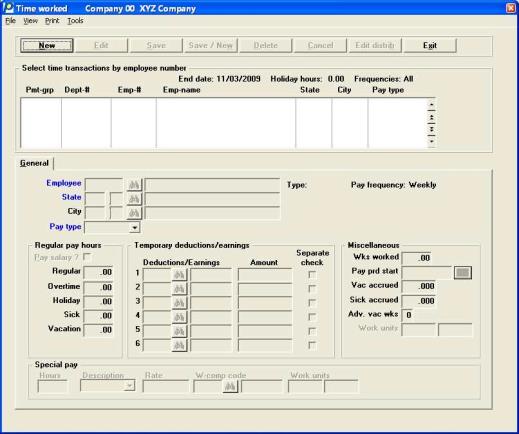
From this screen you can work with both new and existing payroll entries.
The list box displays up to 6 existing payroll entries at a time. You may sort the payroll entries by payment group, department or employee number all in ascending or descending order. Only columns with red labels may be sorted. To select a field or change the sort order, click on the column name or the arrow to the right of the column name or use the View options.
To locate a payroll entry, start typing a payment group, department or employee number, depending on which sort field is selected. You may also use the up/down arrows, Page up, Page down, Home and End keys to locate an entry. The <F1> and <SF1> keys function the same as the up/down arrow keys.
Payroll entries that display in the list box are available for changes or deletion. The fields for the selected payroll entry display in the lower part of the screen.
When a payroll entry is found, you may select the <Enter> key or Edit button to start editing.
You may click on a button or enter the keyboard equivalent for adding, editing, deleting or canceling a payroll entry:
| Button | Keyboard | Description |
|
New |
Alt+n |
For a new payroll entry |
|
Delete |
Alt+d |
To delete the payroll entry selected in the list box |
|
Edit |
Alt+e |
To edit the payroll entry selected in the list box |
|
Save |
Alt+s |
To save a new payroll entry or changes to an edited payroll entry |
|
Save/New |
Alt+w |
Same as Save button plus the New button |
|
Cancel |
Alt+c |
To cancel adding or editing a payroll entry |
|
Edit distrib |
Alt+b |
To edit the distributions for the selected payroll entry. See the Distribution section for more information |
|
Exit |
Alt+x |
To exit the screen. You may also use the <Esc> key |
Character
In character mode the following screen displays:
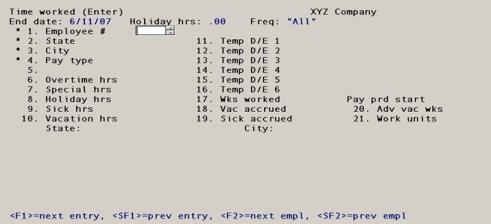
From this screen you can work with both new and existing payroll entries. If an existing entry is selected (either by explicit data entry or by using the option keys), its data displays on the screen and the cursor is positioned at Field number to change ? to allow change or deletion. If a new entry is selected, the cursor moves to the next field to allow data entry.
From this screen you can access Employee History information using the Drill down feature <SF8>. This feature is explained in the PBS System documentation.
General Information
There can be more than one entry for a single employee (for different states, cities, or frequencies). These may or may not print on the same check. Note also that all the entries on file at any one time are all destined for the next payroll — you cannot have entries for more than one payroll run present at the same time.
Options
Enter the number of an existing employee (including non-employees, generally contractors), or use one of the options:
|
<F1> |
For the next existing entry |
|
<SF1> |
For the prior entry |
|
<F2> |
For the next employee, in employee number sequence, whose pay frequency matches one of those you specified on the first screen (except terminated employees and non-employees) |
|
<SF2> |
For the prior matching employee |
Exception conditions
| • | If you enter the number of an employee whose pay frequency does not match one of the pay frequencies entered on the first screen, you see Wrong Frequency - Pay Anyway ? |
| • | If the employee you enter has been terminated, you see Employee Terminated - Pay Anyway ? |
In either case, answer Y or N.
|
Format |
999999 |
|
Example |
Type 4 |
If this is a multi-city/state employee (so designated in the Multi-city/state check box field of the selection Employees), enter the State Tax Code. This must already have been defined for this employee (either as his primary state or as one of the other states to which he is liable for taxes). The code entered for the primary state is the default and displays if you press <Enter>.
Otherwise, this field is filled automatically from the Employees entry for this employee.
|
Format |
Two letters (state) One character (tax table) |
|
Example |
(displayed automatically in this example) |
If this is a multi-city/state employee (so designated in the Multi-city/state check box field of the selection Employees), enter the City Tax Code. This must already have been defined for this employee (either as his primary city or as one of the other municipalities to which he is liable for taxes). The code entered for the primary city is the default and displays if you press <Enter>.
Otherwise, this field is filled automatically from the Employees entry for this employee.
|
Format |
Two letters (city) One character (tax table) |
|
Example |
(displayed automatically in this example) |
Enter Regular or Special 1-9 for special. Special pay types enable you to enter multiple pay rates and/or worker’s compensation codes for an employee in the same pay period. For example, an employee can receive a set rate per hour plus a shift differential. In this case, you can set a special rate in the employee record equal to the regular hourly rate plus the differential percentage. Or, you may have an employee who performs maintenance, as well as administrative duties. In this case, you could set up a special pay rate based on worker’s compensation deduction codes.
You cannot enter regular pay and special pay on the same screen. If you select Regular pay, the special pay fields cannot be entered. If you select pay type Special 1-9 (special pay), the cursor skips over the fields in Regular pay hours, Temporary deductions/earnings and Miscellaneous boxes. Once you enter a special pay code, you must enter the Special hrs. field, then a data selection window displays, displaying special pay codes. Refer to the Special Pay Codes section below for more information.
|
Format |
One digit. The default is 0. |
|
Example |
Press <Enter> |
Options
If the employee type, as recorded in Employees, is salaried, then the Pay Salary ? field can be entered. If the employee type is Hourly, only the Regular field can be entered.
|
<F1> |
Defaults all fields to their typical values:
For a salaried employee, Pay salary ? is set to Y, otherwise Regular hours is set according to the employee pay frequency.
Holiday hours are set to the amount entered on the first screen.
Vac accrued and Sick accrued are set to the amounts in the Employee record.
Wks worked is set to the number for the employee’s pay frequency.
Pay prd start is set to the date entered on the first screen. |
Check the box to pay this employee his regular salary for this pay period. Leave it unchecked to treat this employee as an hourly employee for purposes of this payroll only.
If paying a salaried employee by hours, you can press <F1> to use the calculated hours, based on the employee’s pay frequency. If you want to pay a salaried employee holiday hours in addition to his salary, answer N to enter regular hours and then enter holiday hours at Field #8.
|
Format |
Check box, checked is yes and unchecked is no |
|
Example |
Press <Enter> for the default of unchecked |
If the employee type, as recorded in Employees, is salaried, then the Pay Salary ? field can be entered. If the employee type is Hourly, only the Regular field can be entered.
Options
For hourly employees and for salaried employees being paid hourly for this particular pay period, enter the number of regular hours worked.
|
<F1> |
Default all fields to their typical values as described for Pay salary ? |
|
<F2> |
To clear all other fields and position the cursor at the first temporary D/E field for entering a single supplemental earning. This enables you to rapidly enter a single supplemental earning. |
|
Format |
99,999.99 |
|
Example |
(does not occur in this example because employee is being paid a salary) |
|
Note |
Rather than enter zero hours which results in a check amount of zero, you should delete the time worked entry instead. |
Enter the number of overtime hours.
|
Format |
999.99 |
|
Example |
Press <Enter> for zero |
The overtime rate can be printed on the stub. See the Print overtime/special rates on stub field in the Control information chapter.
Options
Enter the number of holiday hours in this pay period, or use the option:
|
<F2> |
For the number of holiday hours from the first screen, provided this was non-zero |
|
Format |
999.99 |
|
Example |
Press <Enter> for zero |
For a salaried employee, the holiday hours entered here are considered a part of the salary.
If you want to pay a salaried employee holiday hours in addition to his salary, uncheck the Pay salary field and pay regular hours for the salaried employee, then enter the holiday hours here.
Enter the number of sick hours used in the pay period. (The amount of sick hours due is held in the Employee file.)
|
Format |
999.99 |
|
Example |
Press <Enter> |
For a salaried employee, sick hours are treated the same as holiday hours. Refer to Holiday above.
Hours available = 999.99-.
Change current entry ?
Select Yes to change, or select the default of No to accept.
This displays only when the number of hours entered exceeds the number of hours due. Pressing <F2> overrides the limit.
Enter the number of vacation hours taken during this pay period.
|
Format |
999.99 |
|
Example |
Type 8 to enter 8.00 hours of vacation. |
For a salaried employee, vacation hours are treated the same as holiday hours. Refer to Field #8 above.
Hours available = 999.99-. Press <Enter> to change, <F2> to accept
This displays only when the number of hours entered exceeds the number of hours due. Pressing <F2> overrides the limit.
Temporary Deductions/Earnings 1 through 6
In these fields, enter the Deductions/ Earnings code for temporary deductions or earnings.
Any deduction or earning that does not occur every pay period, or that occurs in varying amounts, qualifies as temporary. For instance:
| • | If you are a restaurant, meals and employee-reported tips are temporary earnings (they vary from one pay period to the next). |
| • | If you dock an employee’s pay for losing a tool, this is a temporary deduction. |
In either case, a code for the earning or deduction must previously have been set up in the Deductions/Earnings selection.
If you want to pay supplemental earnings, you can do so here by using a type S earning code for supplemental earnings.
Enter the appropriate deduction/earning code, or leave blank to not use this field. The formats are the same for all six fields, but examples will be given only for the first. Copy the examples for the remaining fields from the screen appearing below.
|
Format |
Three characters |
|
Example |
Type EC1 |
The description Comissn displays.
Enter the dollar amount, or press <Esc> to clear the amount and return to the code field.
|
Format |
999,999.99 - Earnings and Supplemental Earnings types 99,999.99 - All deduction types |
|
Example |
Type 125 to enter the amount as $125.00. |
|
Note |
Never enter or calculate deduction amounts that are greater than the amount of a check. The system cannot calculate taxes on negative amounts. |
This applies only to earnings, not to deductions.
| • | Supplemental earnings: Multiple separate checks are allowed for supplemental earnings codes. Deductions for loans, garnishments, or union fees will be taken based on the flags in Control information. |
| • | Non-supplemental earnings: Only one type of non-supplemental earnings (commissions) is eligible for separate checks. Furthermore: |
If this is a multi-city/state employee, the check is taxed only for the employee’s primary state and city.
No deductions will be taken for loans, garnishments, or union fees.
|
Format |
Graphical: Check box, checked is yes and unchecked is no Character: Enter Y or N |
|
Example |
Select the <Enter> key for the default of unchecked |
|
Note |
If you are using ACH direct deposit and if you select to print a separate check, the program will generate a physical check and not include either the supplemental earnings and non-supplemental earnings amount as part of the direct deposit. |
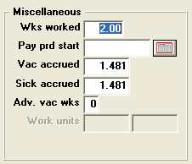
Miscellaneous
Options
Enter the number of weeks worked in this pay period, or use the option:
|
<F2> |
To use the number of weeks in the employee’s pay period as specified in the Control information |
|
Format |
99.99 |
|
Example |
Press <F2> to use the number of weeks in a semi-monthly pay period (2.16). |
Options
Enter a date or use one of the following:
|
<F1> |
New Records: use the pay period starting date from the initial screen.
Existing Records: use the date previously entered in this record. |
|
<Enter> |
To skip this field |
|
Format |
MMDDYY |
|
Example |
Press <Enter> to skip the pay period start date. |
Use this field to accrue vacation time for the employee.
Options
Enter the number of vacation hours to accrue or use the option:
|
<F2> |
To accrue the vacation hours using the method specified in the employee’s record. |
|
Format |
999.999 |
|
Example |
Press <F2> |
Vac hours start accruing mm/dd/yy. Press <Enter> to accept, <F2> to change
This displays only if the employee is not due to accrue vacation time yet (i.e., the pay period ending date for this transaction is before the employee’s vacation hours due date). Press <F2> to change the entry or <Enter> to override the limit.
Use this field to accrue sick time for the employee.
Options
Enter the number of sick hours to accrue or use the option:
|
<F2> |
To accrue the sick hours using the method specified in Employees |
|
Format |
999.999 |
|
Example |
Press <F2> |
The following message displays only if the employee is not due to accrue sick time yet (i.e., the pay period ending date for this transaction is before the employee’s sick hours due date):
Sick hours start accruing mm/dd/yy. Press <Enter> to accept, <F2> to change
Press <F2> to change the entry or <Enter> to override the limit.
Enter the number of weeks of advance vacation pay (up to 4 weeks) to pay the employee. You can press <Enter> to leave this field blank.
If the number of weeks of advance vacation pay, plus the number of vacation hours entered in the Vacation field, is more than the vacation hours due as entered in the Employee file, a message displays as in the Sick accrued field above and is handled in the same way.
Four weeks of advance vacation pay is the maximum that can be paid at a time to an employee. A separate check is printed for each week of advance vacation pay. Any vacation hours entered above in Vacation field are part of the employee’s regular paycheck.
|
Format |
One digit |
|
Example |
Press <Enter> |
Companies in states which base workers’ compensation premiums upon the number of work units (such as employee-weeks, employee-days, etc.) must enter here the number of work units that pertain to the employee being paid.
In addition to this, if a special tax code based upon work units has been specified in the employee’s record, then you must enter the number of work units for the special tax amount calculated.
If the employee does not have a workers’ compensation code specified or does not have a special tax deduction based upon work units specified, then this field displays (N/A) and entry is skipped.
If applicable, the work unit description for this employee displays to the right of the field. Total work units for the pay period are reported on the Payroll Register along with the calculated premium amount.
Enter the number of work units for the employee. If the work unit is employee-days and the employee is being paid bi-weekly, you would enter 10 work units (unless the employee took days off during the period).
|
Note |
The work units entered here are only for the non-special pay. Special pay has it’s own work units and workman’s compensation classification. |
|
Format |
999.99 |
|
Example |
The work unit description, Week, is displayed to the right of the field. |
You can enter up to three default pay codes for each employee using the Employees, Enter option. Read more about the employees Special Pay fields.
These default special pay codes appear on the data selection window once a special pay code and special hrs are input for the employee in the Time worked, Enter function. You can also designate other special pay codes (up to 9) by entering unique description in the Description field OTHER that what the drop down list box displays.
First, enter the hours, then enter a five-character description of the special pay code. Then, enter a numeric rate (99,999.999 format) for this employee. Next, enter a worker’s compensation code for this employee. The Workers’ compensation Code is set up in the Deductions/Earnings table. If the worker’s compensation code entered uses a rate basis of Work units, enter the number of work units for this employee. The work unit set up in the Deductions/Earnings Table (hrs. day, wk.) will appear.
A special pay rate can be printed on the stub. See the Print overtime/special rates on stub field in the Control information chapter.
Enter the number of special hours.
|
Format |
999.99 |
|
Example |
Press <Enter> for zero |
Make any needed changes.
Options
For an existing entry, you can also use the option:
|
<F3> |
To delete this entry |
What happens when you press <Enter> depends upon whether this is a new entry or an existing entry, and also upon whether this employee’s pay is distributed manually or automatically. That in turn depends upon what you have answered to the fields Distribute wages in Employees and Distribute wages in Control information.
| • | If wages are distributed manually: |
In add mode, the distribution screen displays automatically.
In change mode:
If you have changed any of the amounts to be distributed (for instance, the number of regular hours), the distribution screen displays automatically.
Otherwise, you are asked Do you wish to change distributions ?. Answer N to terminate this entry, or Y to view (and possibly change) the distribution screen.
| • | If wages are distributed automatically the distribution screen occurs in neither add mode nor change mode. That is the advantage of automatic distribution. Pressing <Enter> terminates this entry and positions you for the next. |
There are two formats for the distribution screen, one for use when the PBS Job Cost is interfaced and one for use when it is not.
| • | The former screen allows (but does not require) that some or all of an employee’s pay be allocated to one or more cost items of one or more jobs. Otherwise the two screens function identically. |
| • | Distribution to jobs is never automatic, so an employee’s wages cannot be distributed to a job unless manual distribution has been specified for that employee. |
| • | Each screen will be discussed separately below. |
In this example the employee is designated to have his pay manually distributed, so a distribution screen displays. This example assumes that Job Cost is not interfaced.
Graphical Mode
The distribution screen without Job Cost is:
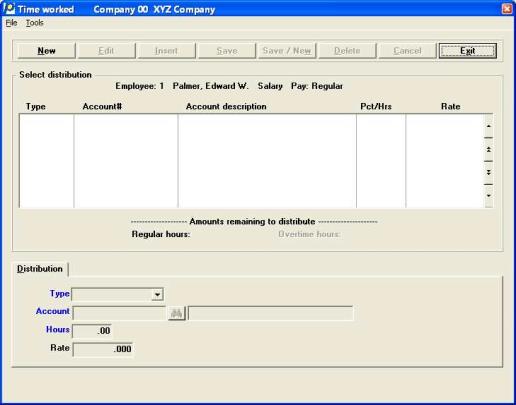
In the screen above, no distributions have been entered.
You may enter an unlimited number of distributions.
The list box displays several existing distributions at a time.
To locate an distribution, you may also use the up/down arrows, Page up, Page down, Home and End keys.
Distributions that display in the list box are available for changes or deletion. The fields for the selected distribution display in the lower part of the screen.
When an distribution is found, you may select the <Enter> key or Edit button to start editing.
You may select a button for editing, deleting or adding a new distribution:
|
New |
Alt+n |
To enter a new distribution |
|
Edit |
Alt+e |
To edit the distribution selected in the list box |
|
Insert |
Alt+i |
To insert a distribution between two other existing distributions |
|
Save |
Alt+s |
To save a new distribution or changes to an edited distribution |
|
Save/New |
Alt+w |
Same as Save button plus the New button |
|
Delete |
Alt+d |
To delete the distribution selected in the list box |
|
Cancel |
Alt+c |
To cancel adding or editing an distribution |
|
Exit |
Alt+x |
To exit the screen. You may also use the <Esc> key |
Character Mode
The character distribution screen without Job Cost is:
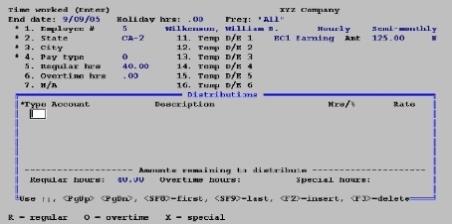
The distribution screen consists of an unlimited number of rows, divided into columns identifying what kind of pay you are distributing, what account you are distributing it to, and how much of it goes to each account.
| • | If this is a new entry, the cursor is initially positioned at the first row. As you enter each new line, the cursor proceeds to the next. When you reach the bottom of the window, you remain there — lines previously entered scroll upwards and out of sight (but are not lost). |
| • | If this is an existing entry, the row you are currently on is highlighted. |
You can select the row you want by pressing <Up>, <Down>, <PgUp>, <PgDn>, <Home>, and <End>.
You can add a new row at the existing location by pressing <F2>. The remaining rows will scroll down by one line.
You can delete the existing row with <F3>.
Distribution Tab
You can have more than one entry for the same account. This lets you enter different distributions for overtime pay at varying rates.
Entries are not required to be in any particular sequence. For instance, you could distribute half the regular hours, then all the overtime hours, then the other half of the regular hours.
A running total shows the amount of each type of pay remaining to be distributed. The possible types depend on whether the employee is salaried or not.
Enter the distribution information as follows:
Options
Enter one of the following values for the type of distribution. Note that hourly employees includes salaried employees who are paid hourly. The options for hourly employees are:
|
Regular |
|
Overtime |
|
Special |
The options for salaried employees are:
|
Salary |
|
Overtime |
|
Special |
To exit from distributions, press <Esc>. If you do this while any pay (of any type) remains undistributed, you will see, Amount remaining to distribute — do you wish to delete the entire entry ?. If you answer Yes, you will have to re-enter the entire entry, not merely its distributions.
|
Format |
Drop down list box with one option from the list above |
|
Example |
Select Salary to indicate that the distribution entered is for the salary amount. |
This is the G/L account to which the number of hours, or the percentage of salary specified on this line, is distributed.
Options
Enter the G/L account number, or use one of the options:
|
<F1> |
Next valid G/L account |
|
<SF1> |
Previous valid G/L account |
|
<F7> |
Wage account number for this employee in the Employee file |
|
Format |
Your standard account number format, as defined in Company information |
|
Example |
Press <F7> |
Sometimes pay is distributed by allocating a percentage of each type of pay to different accounts, and sometimes by allocating the actual number of hours. In no case is the dollar amount entered directly.
| • | If the employee is specified as hourly, enter the number of hours distributed to the account you entered on this distribution line. |
| • | If the employee is salaried, enter the percent of the salary (or the number of hours, if being paid on an hourly basis) distributed to the account entered on this line. |
| • | Overtime and special hours are distributed on an hourly basis, even for a salaried employee. |
An employee’s pay for holiday hours, sick hours, and vacation hours is always computed using the regular rate. These pay amounts are distributed to accounts specified in the federal tax code record.
For hourly paid employees, pay for regular hours is distributed as described above in addition to holiday pay, sick pay, and vacation pay.
For salaried employees (when being paid salary and not hourly), holiday pay, sick pay, and vacation pay are first deducted from their salary. Distribution percentages are then applied to the salary remaining.
Options
Enter the hours or percent, or use the option:
|
<F2> |
For the hours/percent remaining to distribute for this pay type |
|
Format |
999.99- (hours) 999.99 (percentage) |
|
Example |
Press <F2> to distribute the entire salary to the default account. |
|
Note |
Before entering hours, remember to convert minutes to hundredths of hours. For example, convert 3 hr 45 min to 3.75 hr. |
If you entered hours in the previous field, enter the rate of pay. This will be multiplied by the hours to determine the dollar amount of this distribution.
Options
You can also use the option:
|
<F2> |
For the employee’s hourly rate (regular, overtime, or special, depending on type) from the Employee file |
For salaried employees, the Rate column is skipped.
|
Format |
99,999.999 |
|
Example |
(This field is skipped.) |
Further examples
|
Example |
Press <Esc> at the Type field. Press <F2> to select the next employee and enter his information as it displays on the screen on the next page. |
Although Employee # 5 is salaried, he is being paid hourly.
To bring Regular hours to the screen, select to not Pay salary ?, then enter the number of hours. Enter enter 24 for the Sick hours field you see Hours available = 9.99. Press <F2> at this point and 24 is accepted. Complete the fields.
Enter the distribution as shown below by following the steps below:
|
Step |
Description |
|
1 |
Press <Enter> to select Regular for Type. |
|
2 |
Enter the account number as shown. |
|
3 |
Press <F2> to use the Hrs/% displayed. |
|
4 |
Press <F2> to use the Rate displayed. |
The distributions window now displays as:

Display the next employee and enter her information, including distributions, as follows:
|
Example |
Press <Esc> at the next distribution Type, then press <F2> to bring up the final employee. |
Enter the information as follows:
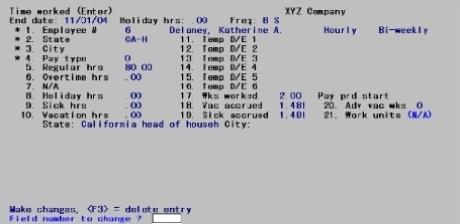
The distribution screen, when interfaced to J/C, is shown below.
The purpose of distributing wages to jobs is to automatically transfer the cost of the labor into the Job Cost system. You do not have to enter the same information twice.
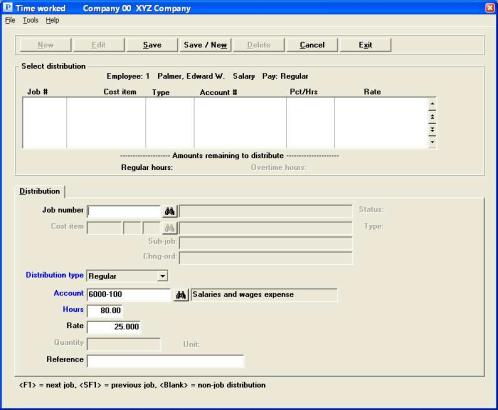
Job Cost Distributions List Box
The list box displays up to 6 existing distributions at a time. You may sort the distributions by job number in ascending or descending order. Only columns with red labels may be sorted. Click the field label or arrow to the right of the column name to change the sort or use the View menu options.
To locate a distribution, start typing the job number. You may also use the up/down arrows, Page up, Page down, Home and End keys to locate a distribution.
Distributions that display in the list box are available for changes or deletion. The fields for the selected distribution display in the lower part of the screen.
When a distribution is found, you may select the <Enter> key or Edit button to start editing.
You may select a button for editing, deleting or adding a new distribution:
|
New |
Alt+n |
To enter a new distribution |
|
Delete |
Alt+d |
To delete the distribution selected in the list box |
|
Edit |
Alt+e |
To edit the distribution selected in the list box |
|
Save |
Alt+s |
To save a new distribution or changes to an edited distribution |
|
Save/New |
Alt+w |
Same as Save button plus the New button |
|
Cancel |
Alt+c |
To cancel adding or editing an distribution |
|
Exit |
Alt+x |
To exit the screen. You may also use the <Esc> key |
Character Mode
If you are in character mode, the following screen displays:
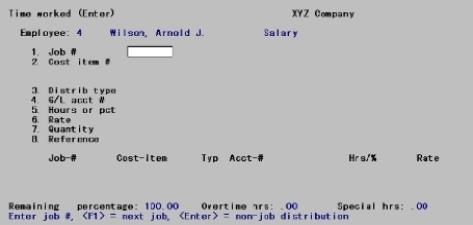
There can be an unlimited number of distributions for each entry. These appear as a table occupying the bottom portion of the screen. Each row represents one distribution. The columns identify what kind of pay you are distributing, what account or job you are distributing it to, and how much of it goes to each job or account.
| • | The table contains only the three most recent entries. The others are still on file, they are just not visible. |
| • | You do not enter information directly into this table. Instead, your entries in the Fields #1 through 8 are displayed in the table as they are entered. |
| • | The table is initially empty and fills from the top as you make new entries. |
If this is a new entry, each new distribution is entered by filling in Fields #1 through 8 and ratifying the result at Field number to change ?. This adds one new row to the table.
If this is an existing entry, you can either add new rows as above, or you can press <F1> to view the next existing distribution. Once you have done this you can change or delete this existing distribution, or simply confirm that it is correct by pressing <Enter> at Field number to change ?. It is important to realize that if you do not press <F1> for any existing distribution, that distribution is still there and continues to contribute to the total already distributed — even though the system has not shown it to you. Therefore, when changing existing distributions you should press <F1> until no more existing distributions remain to be processed.
General Information
You can have more than one entry for the same job, cost item, or account. This lets you enter different distributions for overtime pay at varying rates.
You can have entries for more than one job. Also, some distributions can be to jobs and some not.
Entries are not required to be in any particular sequence. For instance, you could distribute half the regular hours, then all the overtime hours, then the other half of the regular hours.
A running total at the bottom shows the amount of each type of pay remaining to be distributed. The possible types depend on whether the employee is salaried or not.
Distribution Tab Fields
Enter the distribution information as follows:
If you are distributing this employee’s wages to a job, enter the job number here. The job must be on file and it must be active. The description of the job is displayed automatically.
For a new entry
Options
Enter the job number, or use one of the options:
|
<F1> |
For the next active job on file |
|
<Enter> |
To enter a non-job distribution. The cursor then moves to Field # 3 |
|
<Esc> |
To exit from distributions |
If you attempt to exit while any pay (of any type) remains undistributed, you will be informed, Distribution is not complete \ Sure you want to abort this entry ?. If you answer Y, you will have to re-enter the entire entry, not merely its distributions.
|
Format |
Seven characters. The last job number entered (if any) displays as the default. |
|
Example |
(Does not occur in this example because not using Job Cost) |
For an existing entry
Options
You can access a distribution by entering its key fields (#1 through 4), or by using this option:
|
<F1> |
For the next distribution on file for this entry |
|
<SF1> |
For the previous distribution on file |
If you enter the key fields for a distribution, the program searches for one that matches what you entered. If one matches, you can change any field except the key fields.
This is the number of the cost item that this distribution is applied to.
The cost item must be on file for the job, and it must be a labor cost item. The description of the cost item displays automatically.
Options
Enter the cost item number, or use the option:
|
<F1> |
For the next labor cost item for the job |
|
Format |
Seven characters (category 999 (sub-job; not present in all cases) 999 (change order; not present in all cases) |
|
Example |
(Does not occur in this example) |
Enter one of the following types of distributions. Note that hourly employees includes salaried employees who are paid hourly.
The options for hourly employees are:
|
Regular |
|
Overtime |
|
Special |
The options for salaried employees are:
|
Salary |
|
Overtime |
|
Special |
|
Format |
One letter from the list above. The default is the first pay type which is not yet completely distributed. |
|
Example |
(Does not occur in this example) |
Enter the number of the G/L account to which the number of hours or the percent of salary is to be distributed.
Options
Enter the account number, or use the option:
|
<F1> |
To use the account for the cost item (if the distribution is for a job)
To use the account for this employee in the Employee file (if the distribution is not for a job) |
|
Format |
Your standard account number format, as defined in Company information |
|
Example |
(Does not occur in this example) |
Sometimes pay is distributed by allocating a percentage of each type of pay to different accounts, and sometimes by allocating the actual number of hours. In no case is the dollar amount entered directly.
| • | If the employee is specified as hourly, enter the number of hours distributed to the account you entered on this distribution line. |
| • | If the employee is salaried, enter the percent of the salary (or the number of hours, if being paid on an hourly basis) distributed to the account entered on this line. |
| • | Overtime and special hours are distributed on an hourly basis, even for a salaried employee. |
An employee’s pay for holiday hours, sick hours, and vacation hours is always computed using the regular rate. These pay amounts are distributed to accounts specified in the federal tax code record.
For hourly paid employees, pay for regular hours is distributed as described above in addition to holiday pay, sick pay, and vacation pay.
For salaried employees (when being paid salary and not hourly), holiday pay, sick pay, and vacation pay are first deducted from their salary. Distribution percentages are then applied to the salary remaining.
Options
Enter the hours or percent, or use the option:
|
<F2> |
For the hours/percent remaining to distribute for this pay type |
Zero entry is permitted only when changing an existing distribution, and only for the purpose of deleting it. The distribution remains visible in the table, but the Hours or pct column displays as Deleted.
|
Format |
999.99- (hours) 999.99 (percentage) |
|
Example |
(Does not occur in this example) |
|
Note |
Before entering hours, remember to convert minutes to hundredths of hours. For example, convert 3 hr 45 min to 3.75 hr. |
If you entered hours in the previous field, enter the rate of pay that is multiplied by those hours to determine the dollar amount of this distribution.
Options
Enter the rate of pay or use the option:
|
<F2> |
For the employee’s hourly rate (regular, overtime, as entered in the Employee file) |
For salaried employees, the Rate column is skipped.
|
Format |
99,999.999 |
|
Example |
(Does not occur in this example) |
If this is a distribution to a job, and there is a unit connected with this cost item such as SQYD (square yards), CUFT (cubic feet), etc., then enter the quantity of these units that was accomplished for this distribution. Even if quantity is entered, hours or percent must be entered as well.
If there is no unit connected with the cost item, or this is not a distribution for a job, this field is skipped.
|
Format |
99,999,999.9- |
|
Example |
(Does not occur in this example) |
If this is a distribution for a job, you can enter any reference or comment you want to make.
This field is skipped if the distribution is not for a job.
|
Format |
25 characters. The default is the same value as the previous distribution for this entry (there is no default for the first distribution). |
|
Example |
(Does not occur in this example) |
Options
Make any needed changes. Press <Esc> to cancel this distribution (it will not be added to the table displayed). Press <Enter> to accept the distribution, add it to the table displayed, and allow entry of a new distribution. You can also use either of the following options. If you do, the current entry is accepted and added to the table before the next/previous distribution is displayed.
|
<F1> |
For the next distribution on file for this entry |
|
<SF1> |
For the previous distribution on file |
|
Note |
In Character mode note the absence of <F3> for deletions. Delete individual distributions by entering zero hours or percent. |
Select
Edit list from the Time worked menu.
In Graphical mode, while on the time worked screen you may also select Edit list from the Print menu.
A list of available printers will display. Select a printer from this list. You may also print the file to disk.
Select
Data import from the Time worked menu.
Use this menu selection to import csv or fixed length time worked transactions into the time worked file and matching distributions.
Data import is a separately licensed application and it may not be available on your system.
For information on using data import see the Data Import documentation.